Flutter SDK
1. Introduction
The BillDesk Flutter SDK allows merchant to seamlessly integrate the BillDesk payment suite with their application and start collecting payments from customers. The BillDesk Flutter SDK takes away the complexity of handling and integrating payment stack in a Flutter project. The SDK opens the payment page in a WebView and completes the payment journey within merchant app sans any external redirections
2. Salient Features
- Low code integration - Accept payments with a few easy steps and minimal code with this offering
- Customizable - Customize aspects such as merchant's company logo, payment methods as well as themes to give their customers an integrated experience
3. Prerequisites
- Obtain your Merchant ID (MID) from BillDesk
- Merchant’s Server public IP address to be whitelisted at BillDesk
- Download the BillDesk Flutter SDK libraries
- It is mandatory that all the below points are implemented, as per industry standards, in the merchant's mobile app (where the BillDesk Flutter SDK will be implemented):
- Root/jailbroken device detection
- Frida, debugger, and objection detection
- Code obfuscation
- Runtime manipulation checks
- Response of the Create Order API ( Explained in section 3.1)
4. Integration Steps

Flow Diagram explaining the workflow
Step 1: Receive the BillDesk Flutter Libraries
Contact your relationship manager for the BillDesk Flutter library.
Note: We currently support dart versions between ">=3.5.0<4.0.0" and flutter versions ">=3.24.0".
Step 2: Integrating the BillDesk libraries in merchant's app
- Navigate to the directory where merchant want to create their merchant Flutter app.
- Run the command :
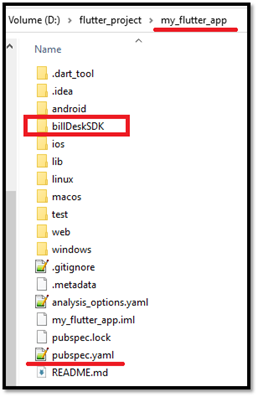
$ flutter create my_flutter_appto create a new Flutter app - Copy the “billDeskSDK” project and paste it into the root level of the directory (Sample image of this command pasted below)
- Import sdk in dependency and configure the path pubspec.yaml your project (Sample image of this command pasted below)
- Add the below configuration in the pubspec file to include all the libraries
dependencies:
  flutter:
    sdk: flutter
  billDeskSDK:
path: ./billDeskSDK- Navigate to the merchant app and billDeskSDK directory. Run the command
$ flutter pub getto fetch and install the defined dependencies
Step 3: Preparing the Configurations
3.1 Creating an order
An order needs to be created for every transaction initiated using the BillDesk Flutter SDK.
To create an order, use the Create Order API. The response of this API provides the bdorderIdand authorization & mercid values which are required to launch the BillDesk Flutter SDK (explained in the subsequent steps)
| Attribute | Description |
|---|---|
| mercid | Unique identifier provided by BillDesk for each merchant. |
| bdorderid | Value generated by BillDesk and provided in the Create Order API response. This value is unique for every order which is created. |
| authorization | An authorization token created by BillDesk and provided in the Create Order API response. This value is unique for every order which is created. |
{
	"objectid": "order",
	"orderid": "ORDERID280920230002",
	"bdorderid": "OAZY21S8GXAC",
	"mercid": "BDMERCID",
	"order_date": "2023-09-28T12:25:00+05:30",
	"amount": "2.00",
	"currency": "356",
	"ru": "https://www.merchanturl.com/response.jsp",
	"additional_info": {
		"additional_info1": "Details1",
		"additional_info2": "Details2"
	},
	"itemcode": "DIRECT",
	"createdon": "2023-09-28T12:33:36+05:30",
	"next_step": "redirect",
	"links": [
		{
			"href": "https://www.domainname.com/pgi/ve1_2/orders/ORDERID280920230002",
			"rel": "self",
			"method": "GET"
		},
		{
			"href": "https://www.domainname.com/pgi/MerchantPayment/",
			"rel": "redirect",
			"method": "POST",
			"parameters": {
				"mercid": "BDMERCID",
				"bdorderid": "OAZY21S8GXAC",
				"rdata": "89fd934cf8ca5ad76b8efbcf1d56caf8546a28d5b7876ad0f4070d48fa9b6bc00d3d5c85cda042d681d4593a28dd4ecf19b97c4f15eddff452885653e3f08425d35868fc0b05dd1af21d6eec07364e13b9a3b8f4fd56bdc6983fa732a7ab5267c2708da2b41de3edbb05919787dd5f7c52d17b8e9522e0965164100632eda8575a59483f667255b1c4b0f63bb4ef61d.70675f706172616d5f656e6333"
			},
			"valid_date": "2023-09-28T13:03:36+05:30",
			"headers": {
				"authorization": "OToken 89fd934cf8ca5ad76b8efbcf1d56caf8546a28d5b7876ad0f4070d48fa9b6bc00d3d5c85cda042d681d4593a28dd4ecf19b97c4f15eddff452885653e3f08425d35868fc0b05dd1af21d6eec07364e13b9a3b8f4fd56bdc6983fa732a7ab5267c2708da2b41de3edbb05919787dd5f7c52d17b8e9522e0965164100632eda8575a59483f667255b1c4b0f63bb4ef61d.70675f706172616d5f656e6333;aHR0cHM6Ly9hcGkuYmlsbGRlc2suY29t"
			}
		}
	],
	"status": "ACTIVE",
	"invoice": {
		"invoice_number": "11221133",
		"invoice_display_number": "11221133",
		"invoice_date": "2023-09-26T12:25:00+05:30",
		"customer_name": "John",
		"gst_details": {
			"cgst": "8.00",
			"sgst": "8.00",
			"igst": "0.00",
			"gst": "16.00",
			"cess": "0.00",
			"gstincentive": "5.00",
			"gstpct": "16.00",
			"gstin": "07AAAAA2194A1A1"
		}
	}
}
Preparing a request payloadEvery API request needs to encrypted. Similarly, the response of each API is also returned in an encrypted format by BillDesk.
A step by step guide to prepare the request payload, transmit it and capture the response is available here.

Pick and choose the flowThe Create Order API is modular and supports 2 additional workflows as add-ons:
- Account Validation Service (AVS): - AVS can be used in case merchant wish to permit the customer to complete the transaction with a pre-defined account. More details on AVS is available here.
- Split Settlement: Applicable in case merchant want the the transaction settlements in multiple accounts. More details on Split Settlement are available here.
Note: If merchant would like to implement these flows, they would need to contact the designated BillDesk RM prior to initiating the integration.

Validity of an orderEvery order created with the Create Order API is valid for a period of 30 minutes. Thus the customer needs to complete a transaction within this timeframe.

3.2: Building the sdkConfig
The sdkConfig acts as a wrapper that encapsulates the necessary configurations and settings required for initializing and configuring the BillDesk Flutter SDK. It serves as the main configuration object for the SDK integration.
Attribute | Classification | Description |
|---|---|---|
sdkConfigJson | mandatory | A JSON object that contains configurations required for initializing the SDK |
responseHandler | mandatory | JavaScript callback function to receive the transaction's metadata after completion of the transaction journey. Note: For UPI and QR payment methods, the response will be received in the response handler and not on the ru or returnUrl. |
isUATEnv | optional | Option to run the BillDesk Flutter SDK in UAT environment. • Set this value as Note: Since this argument is optional, if the attribute is not passed, it will be treated as |
sdkConfig(
  	sdkConfigJson: sdkConfigJson,
  	responseHandler: responseHandler,
  	isUATEnv: false
	)
3.3: Building the sdkConfigJson
The sdkConfigJson is a JSON object that represents the configurations that merchant will prepare specific to their integration
| Attribute | Classification | Description |
|---|---|---|
| flowConfig | mandatory | A JSON object which defines how certain aspects of the the SDK will render |
| merchantLogo | mandatory | Merchant logo as a base 64 image. We recommend maintaining the logo size as 120 pixels (width) x 60 pixels (height) |
| flowType | mandatory | Fixed value of "payments" |
final sdkConfigJson = {
      "flowConfig": flowConfig,
      "flowType": "payments",
      "merchantLogo": merchantLogo,
      “themeConfig” = jsonDecode(“
	{
              sdkPrimaryColor: "#69068a",
              sdkAccentColor: "#cf5df5",
              sdkBackgroundColor: "#f2caff",
              sdkBannerColor: "#982cbb"
            }
        “)
    }
3.4 Building the flowConfig
The flow config is an object which defines how certain aspects of the the SDK will render. It contains:
- Values received from the Create Order API (Step 1).
- Customizations that merchant would like to make on the BillDesk Flutter SDK.
Elements in the flow_config object:
Attribute | Classification | Description |
|---|---|---|
mercid | mandatory | Unique identifier provided by BillDesk for each merchant. |
bdorderid | mandatory | Value generated by BillDesk and provided in the Create Order API Response. This value is unique for every order which is created. |
authToken | mandatory | An authorization token created by BillDesk and provided in the Create Order API Response This value is unique for every order which is created. |
returnUrl | mandatory | The URL where the customer is to be redirected post completion of the payment on the BillDesk Web SDK. BillDesk will also
|
retryCount | optional | Number of retry attempts merchant wants the customer to be able to get. In case, the earlier attempt to complete the transaction failed, the customer will get an option to retry the payment. |
prefs | optional | Changes in the SDK UI based on specific parameters: • payment_categories •allowed_bins: •netBanking object: 1. The "showPopularBanks" attribute is : "Y" Possible values which can be passed here are: 2. The "showPopularBanks" attribute is: "N” Note: Even if a list of banks has been passed in the "popularBanks" attribute in this case, no popular banks will be shown. |
var flow_config = {
	merchantId: "BDMERCID",
	bdOrderId: "TSFFDHWE",
	authToken: "OToken FDD5C104249A4CDAE734623"],
	returnUrl: "http://www.demo.com/api/pgresponse",
	retryCount: 3,
	prefs: {
		"payment_categories": ["card", "nb"],
		"allowed_bins": ["459150", "525211"]
	},
	netBanking:{
		"showPopularBanks" : "Y",
		"popularBanks": ["Kotak Bank"," AXIS Bank [Retail]"]
	}
}
Step 4: Include the function to launch the SDK
The scripts and configuration objects created in the steps above need to be passed to the function: SdkWebView.openSdkWebView(sdkConfig, context);to launch the BillDesk Flutter SDK.
Step 5: Capture the transaction response
This section explains the workflow involved the capturing the transaction response once the customer has completed a transaction on the BillDesk Flutter SDK.
5.1 : Initialize the SDK Response Handler
The first step in processing the transaction response received from the SDK is to initialize the ResponseHandler. The ResponseHandler is an essential component that handles the responses and errors generated by the SDK during transaction processing.
Note: For UPI and QR payment methods, the response will be received in the response handler and not on the ru or returnUrl.
Sample code for the ResponseHandler:
ResponseHandler responseHandler = SdkResponseHandler(flowType: FlowType.payments);
5.2 : Implement Response Handling Functions
Next, the merchant needs to implement two functions within the ResponseHandler class: 1. onTransactionResponse and 2.onError. These functions will be called by the SDK to provide the results of a transaction or report any errors encountered during the process.
| Attribute | Description |
|---|---|
| ResponseHandler Class | The ResponseHandler class is an interface that defines two methods for handling transaction responses and errors |
| onTransactionResponse | This method is called when a transaction response is received from BillDesk. It provides the TxnInfo object that contains information about the transaction |
| onError | This method is called when an error occurs during the transaction process. It provides the SdkError object that contains details about the error. |
TxnInfo Class:
The TxnInfo class represents transaction information and is used to encapsulate the details of a transaction response.
Txn(txnInfoMap='{
  isCancelledByUser: false,
  orderId: BDSDK1689592751433,
  merchantId: BDMERCID
}')
Attribute | Description |
|---|---|
isCancelledByUser | Can take the value of either
|
orderId | Order id passed in the Request of the Create Order API |
5. Next Steps
Once the transaction is completed, the below 3 APIs are available to Create a Refund or Query the status of a transaction / refund
Transaction Status CheckMerchant can check the status of a transaction at any point using the Retrieve Transaction API
RefundsMerchant can initiate a refund for any successful transaction using the Create Refund API
Refund Status CheckMerchant can check the status of a Refund at any point using the Retrieve Refund API
6. See Also
Review the associated add-on workflowsHere are quick links to access the Account Validation Service (AVS) and Split Settlement workflows elaborated in the sections above.